
Getting Started with VoiceThread
You can either expand each of the sections below for instructions with screenshots, or scroll down to the "Using VoiceThread in Blackboard" workshop video.
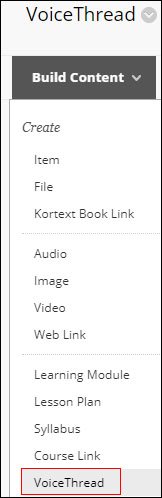
Add a VoiceThread link
In your Blackboard course, with Edit Mode On, select VoiceThread from the Build Content menu.
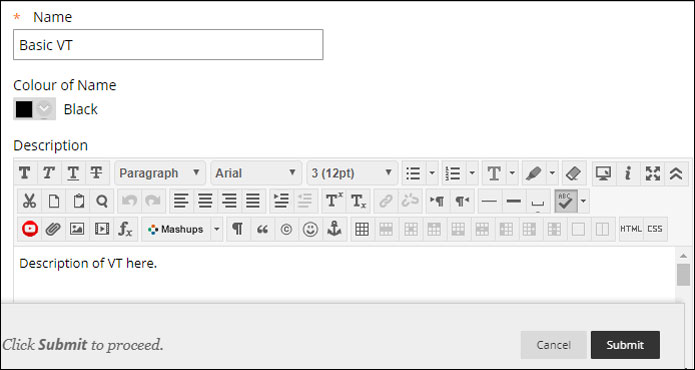
Give your VoiceThread a title and brief description.
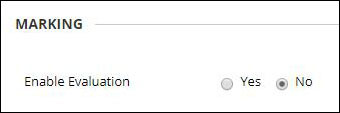
Before you press the Submit button, you need to decide whether you want your VoiceThread to be graded or ungraded.
The default setting is No, ie. ungraded. If this is what you want, go ahead and press the Submit button.
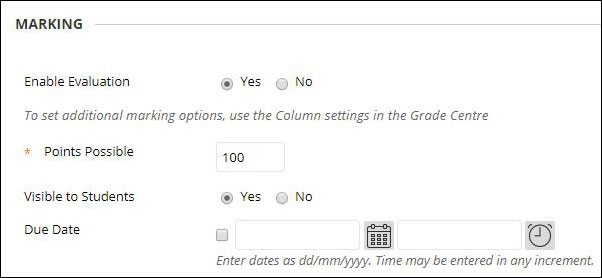
However, if you want to set up a graded assignment, select Yes for Enable Evaluation and enter a figure for Points Possible.
Press the Submit button.
Your VoiceThread link will appear in your Blackboard course.

Create a New VoiceThread (Ungraded)
When you click on the VoiceThread link you created in the previous step, your VoiceThread Homepage appears. Any VoiceThreads you have created previously - or that have been shared with you by others - will be listed.
To create a new VoiceThread, press the Create button from the toolbar.

Click on Add Media and select the type of content you want to add.

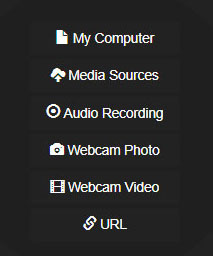
The permitted file types are:
- Images - JPEG, GIF, PNG, BMP, and SVG
- Audio - MP3 or WAV
- Video - MP4, WMV, MOV, AVI
- Documents - DOC, DOCX, PDF, XLS, XLSX, ODT, and ODS
- Presentations - PPT, PPTX, Keynote, ODP, and PDF
N.B. Maximum file size: 3GB
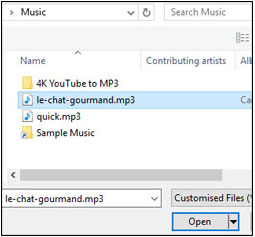
In this example, we have used the My Computer option to upload a PDF. Once the file has been uploaded, it will be displayed like this:

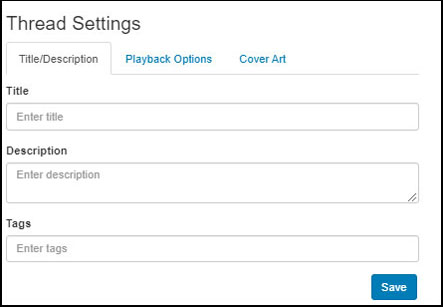
The file(s) you selected will be uploaded and you will see the Thread Settings options.
Thread Settings
The default view of the Thread Settings is the Title/Description tab. Give your VoiceThread a title and description (optional) but don't click Save just yet!
Next, click on the Playback Options tab. The telephone option is not available in the UK so you can un-tick that box.
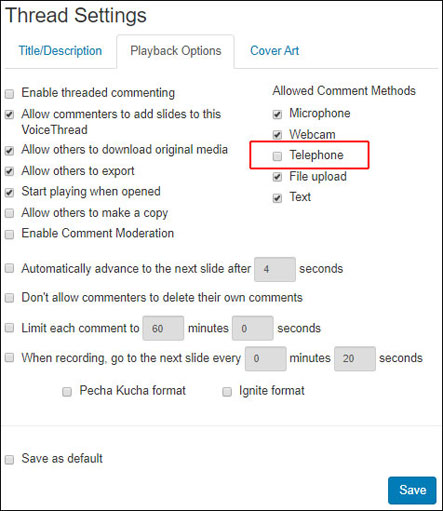
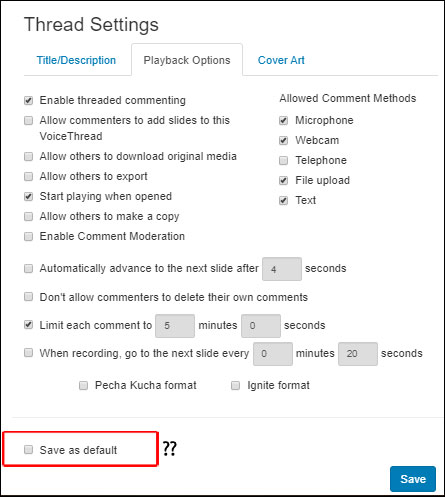
You can amend other settings as you wish. The image below shows the suggested settings for an ungraded VoiceThread. You can save your settings as the default for any future VoiceThreads you create.
When you have finished selecting your preferred settings, press the Save button.
Add Comments to your VoiceThread
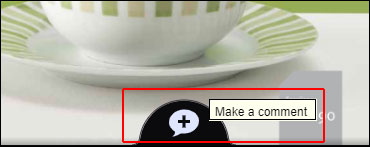
To add comments to your VoiceThread slides, press the Comment button on the top left toolbar.

You will see the first slide of your VoiceThread.
Click the + sign at the bottom of the slide and select which sort of comment you want to make:
The comment type options are:
- Text
- Record audio
- Record video
- Upload pre-recorded audio or video

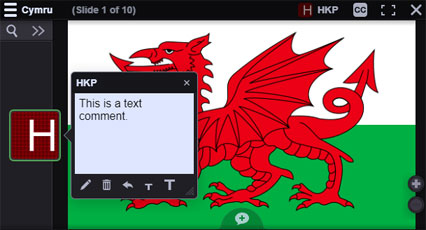
Commenting with Text
Press the ABC link to add a text comment and press the Save button. You comment will appear in the Comment Channel on the left of the VoiceThread slide.
Comment with Audio or Video
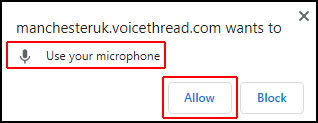
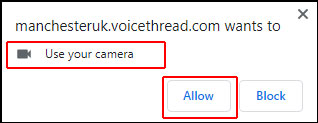
When you select to comment using audio or video for the first time, you will be asked to allow VoiceThread to access your microphone or webcam. In each case, click the Allow button.
With both audio and video comments, you will see a 4-second countdown before recording begins.

Recording will start once the countdown has finished. There will be a Stop Recording link underneath the slide you are commenting on.
![]()
Press the Stop Recording link when you have finished recording your comment. After a few moments, you will have the option to Save the comment, or Cancel and re-record.
![]()
If you choose to save your recorded comment, it will appear in the Comment Channel on the left of the slide.
Commenting with Pre-recorded Audio or Video
When you choose to upload a pre-recorded audio file, you can select the file from a File Browser window that will show any supported audio file types.
How Comments Are Displayed
When you have finished adding comments to your slides, they will appear in a Conversation Channel down the left-hand side of the screen. Each comment shows the commentator's initials or their profile picture (if they have uploaded one).

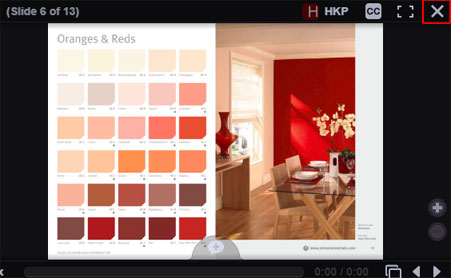
When you have finished adding comments, close the VoiceThread by clicking the 'X' in the top right-hand corner.
Share Your VoiceThread
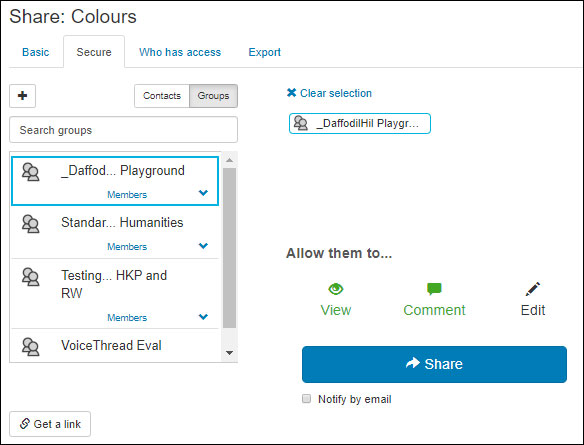
When you've finished adding content and comments to your VoiceTread, you need to share it with your students. Click the Share button on the toolbar above the slides.

Now select the 'Group' (course) you want to have access to the VoiceThread, and finally click the blue Share button. You should see a 'Success!' message.
Create a Graded VoiceThread Assignment
Update: October 2020 - New Assignment Features!
You can read more about the new VoiceThread Assignments here or watch the short video below.
Current Assignment View
In your Blackboard course, with Edit Mode On, select VoiceThread from the Build Content menu.

Give your VoiceThread a title and brief description. To set up a graded VoiceThread, select Yes for Enable Evaluation enter a figure for Points Possible.

Press the Submit button. Your VoiceThread link will appear in your Blackboard course.
When you click on the VoiceThread Assignment link in your Blackboard course, you will now see a new button: the Assignment Builder.

To create the assignment, press the Assignment Builder button.
There are three assignment types to choose from:
- Create a VoiceThread: requires students to create and submit a unique VoiceThread of their own.
- Submit a Comment: requires students to post and submit comments on a VoiceThread posted by you. You decide the number of comments required by each student.
- Watch a VoiceThread: requires students to view an entire VoiceThread posted by you. The system will not allow a student to submit verification of viewing until the entire VoiceThread plays from beginning to end.

Assignment Option 1: Create a VoiceThread
Click on Create and then click Continue.

This will take you to the Choose options menu which will allow you to set up the basic parameters you wish all student VoiceThreads to follow.

Note: Comment Moderation allows you to review all comments before allowing others to see them. If Comment Moderation is enabled, your students can't see one another’s comments unless you choose to reveal them. If you would like to use this feature, make sure it is selected before pressing the Create Assignment button.
Once you have selected your preferred options for the assignment, click Continue and you will be taken to the Finalize tab. Fill in the options and select Publish to save your assignment.

Note: if using start and due dates students will not be able to see the assignment before the start date or submit after the due date. If you want the assignment to start immediately leave the start date blank. Also make sure you use the same due date as you did when setting up the assignment in Blackboard.
Assignment Option 2: Submit a Comment
Click on Comment and then click Continue.

This will take you to the Choose content menu. Here you can either select an existing VoiceThread for students to comment on or create a new one.

If you choose an existing VoiceThread, select Continue and this will take you to the Choose options menuwhich will allow you to set up the parameters for how students should comment. Please note selecting an existing VoiceThread will create a copy of the VoiceThread.
Once you have selected your preferred options for the assignment, click Continue and you will be taken to the Finalize tab.
Assignment Option 3: Watch a VoiceThread
Click on Watch and then click Continue.

This will take you to the Choose content menu. Here you can either select an existing VoiceThread for students to watch or create a new one. If you choose an existing VoiceThread, select Continue and this will take you to the Choose options menu which will allow you to set up the parameters for how students should comment. Once you have selected the correct options for your assignment, click Continue and you will be taken to the Finalize tab.
Grading Students' Assignments
When you are ready to grade the students' submissions, click the specific VoiceThread Assignment link in your Blackboard course. You will see the grading interface automatically. All submissions will be listed by student name down the right side of the screen. Selecting a student name allows you to view their submission and enter a grade. You can also view the original assignment content for Comment and Watch assignments.

Enter the grade value in the box and press the Enter key on your keyboard. (This saves the grade.) The grade will be entered into your Blackboard course Grade Centre.

If you have set the assignment to be worth fewer than 100 points, still grade it on a scale of 0-100, and the score will be adjusted accordingly in the Grade Centre.
Workshop Video: Using VoiceThread in Blackboard
Click on the image below to watch a recording of an online workshop - "Using VoiceThread in Blackboard."
